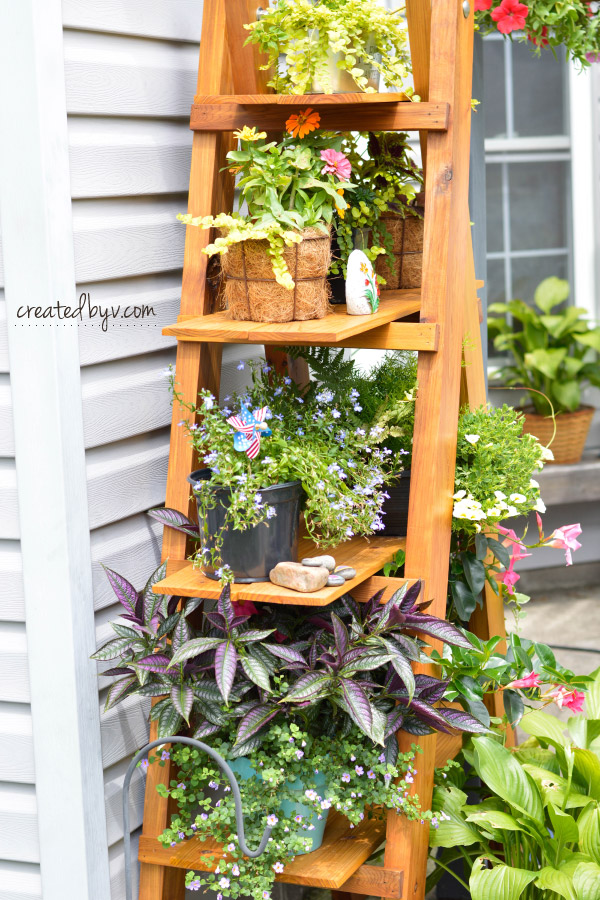
I am not an expert gardener. Just a woman in love with growing pretty plants and flowers. And I was turning our home into a jungalow with my greenery. Now that the weather has finally warmed, I can work outdoors and so I built this A-frame folding plant stand to beautifully contain my collection!
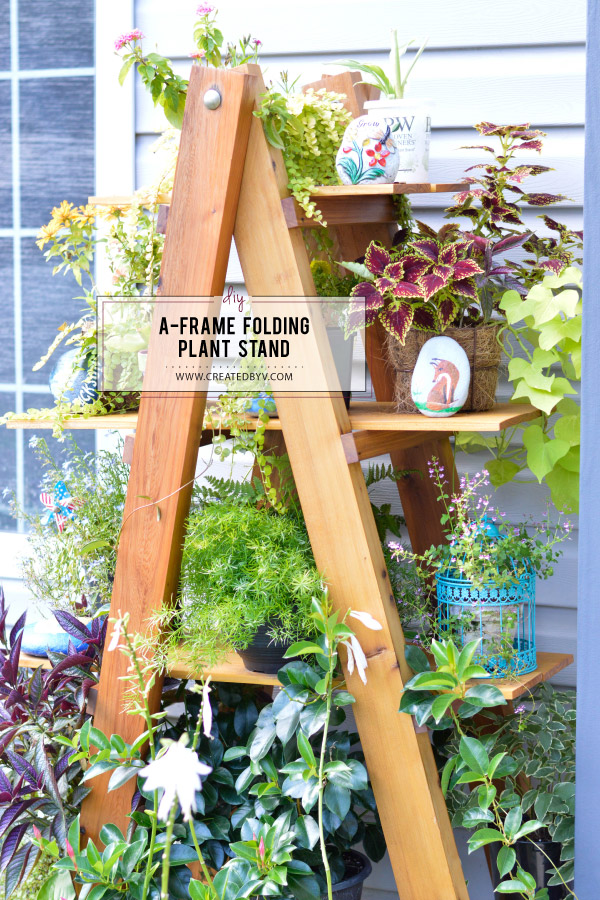
This spot receives plenty of afternoon sun, and I can even combine shade-lovers with the cover the shelves provide. The stand is collapsible, like a ladder, so I can move it indoors for easy storage come winter (or hurricanes). And I finished it easily in a weekend — including drying time — which is a huge feat for me.
There’s lots to love about this quick and easy DIY project!
If you’re interested in building something similar for your home, here’s how.
Tools & Materials
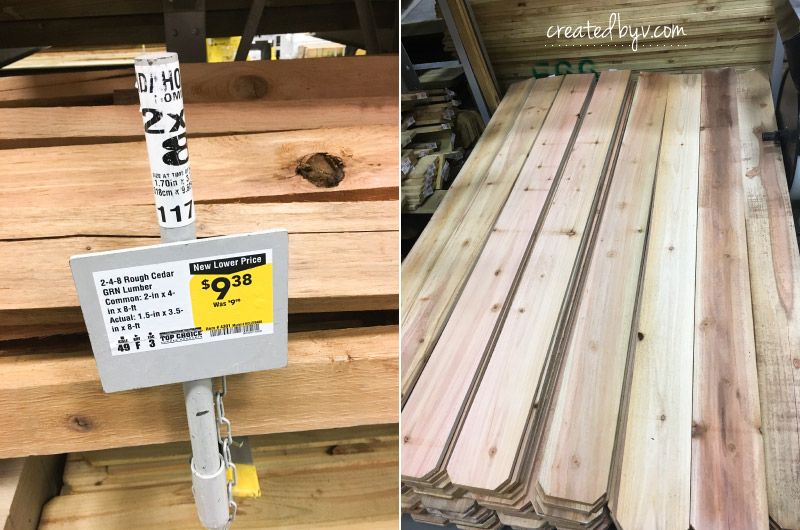
- (4) rough-cut cedar 2″ x 4″ x 8′
- (5) cedar fence pickets 5/8″ x 5-1/2″ x 6′
- (2) 1/2″ stainless steel carriage bolts
- (2) 1/2″ stainless steel flat washers
- (2) 1/2″ stainless steel lock nuts
- table saw / miter saw
- drill press or hand drill with bits
- sander / sand paper
- pneumatic nailer with brads
- wood glue
- sealer / 5″ lambswool applicator
Step 1: Prep the lumber.
Instead of using pressure-treated lumber, I built my outdoor plant stand out of western red cedar because of its natural ability to resist rot and decay. I saved a few pennies by using rough-cut cedar 2x4s for the A-frame and cedar fence pickets for the shelves.
To prep the 2x4s, Sam and I ran them through his benchtop planer to make them all the same size with smooth surfaces. (If you don’t have a planer at your disposal, give all the boards a good sanding by hand.)
It was my first time using a planer, and I marveled at how easily the wood went from rough and yucky to beautifully smooth — no sanding necessary!
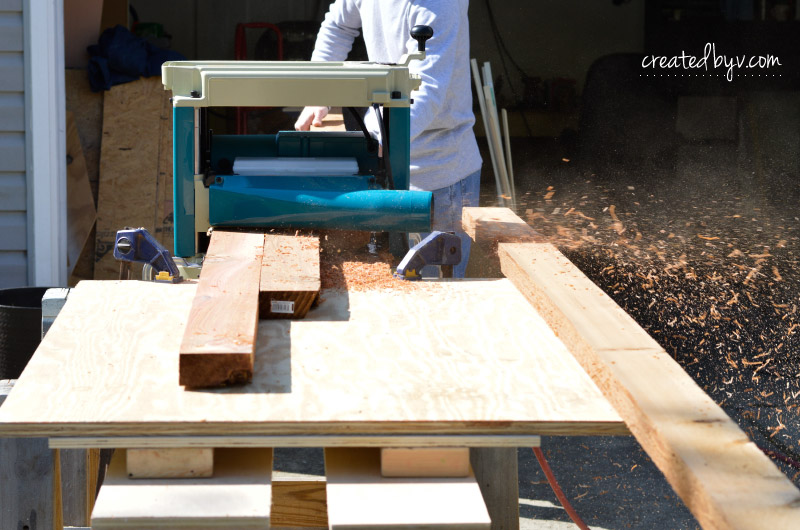
Here’s how it works: the planer cuts a bit off at a time, reducing the board’s thickness with each pass.
We started by running all the boards through at the maximum threshold and then adjusted down from there. That’s the key: run all the boards through and then adjust. In doing so, the boards are all reduced by the same amount. Continue passing the boards through until you reach the desired smoothness. Then flip and do the other three sides the same way.
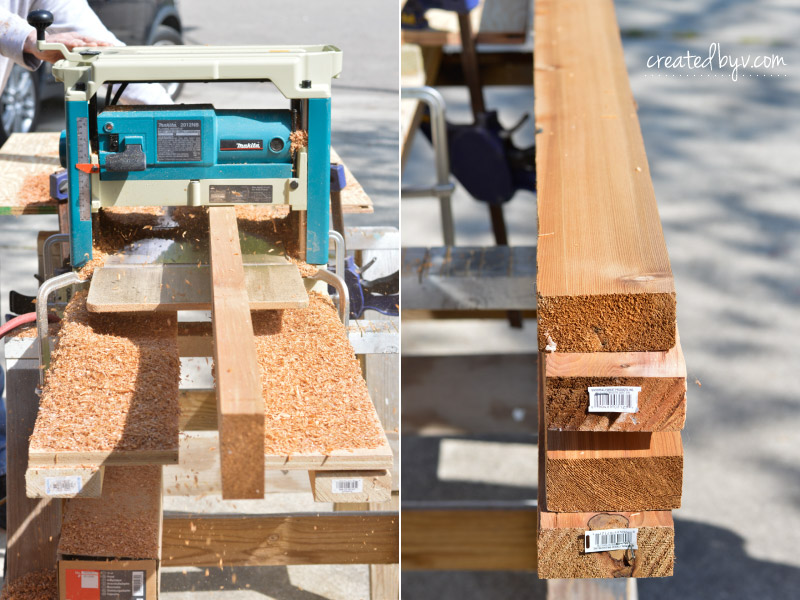
Bonus! All those cedar shavings smell ah-mazing! (I collected a bag to use as mulch in my garden.)
As for the cedar fence pickets, they are already quite thin — and a few were bowed — so they weren’t worth running through the planer. A quick sanding knocked off the rough spots and got them ready for building.
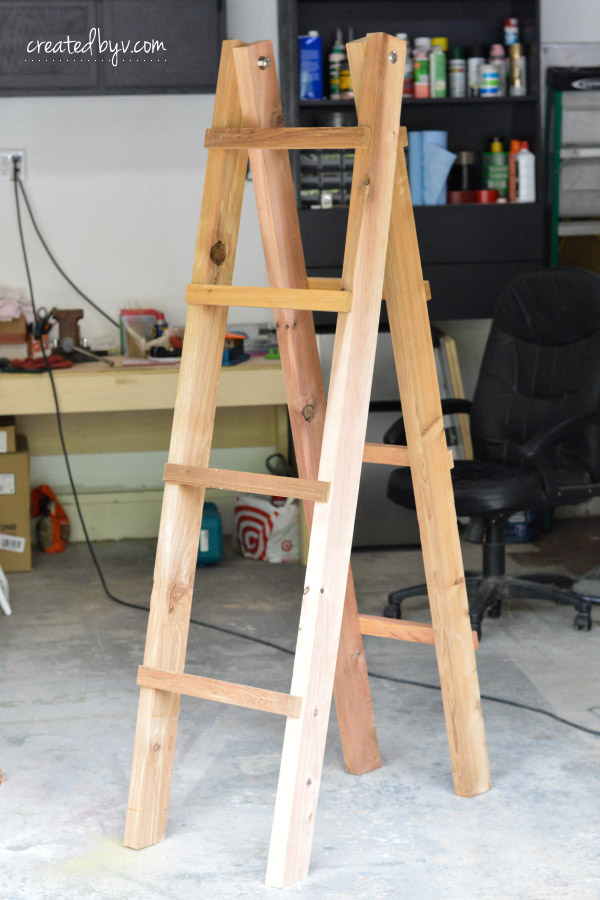
Step 2: Build the A-frame.
Here’s my design. It’s similar to a ladder, making it collapsible and easily stored at the end of the season. I planned on placing it in a small space next to the pergola, so that forced its width. You can certainly adjust these numbers to best suit your space.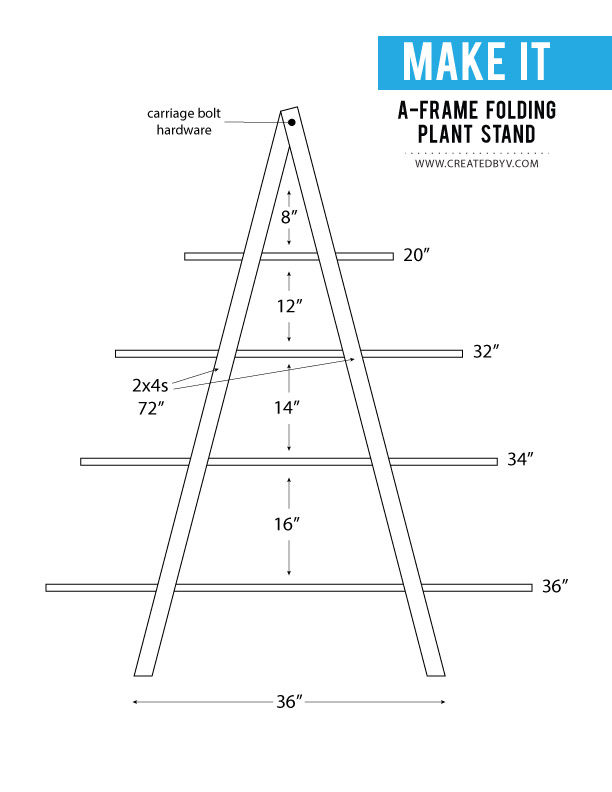
Click HERE to download the printable PDF format.
I used 2x4s to build the frame and cut them to length with a miter saw. To join them, I marked center about 2″ from the top and punched a 1/2″ hole through each board with a drill press for the carriage bolt. I chose stainless steel hardware because it won’t rust in the elements.
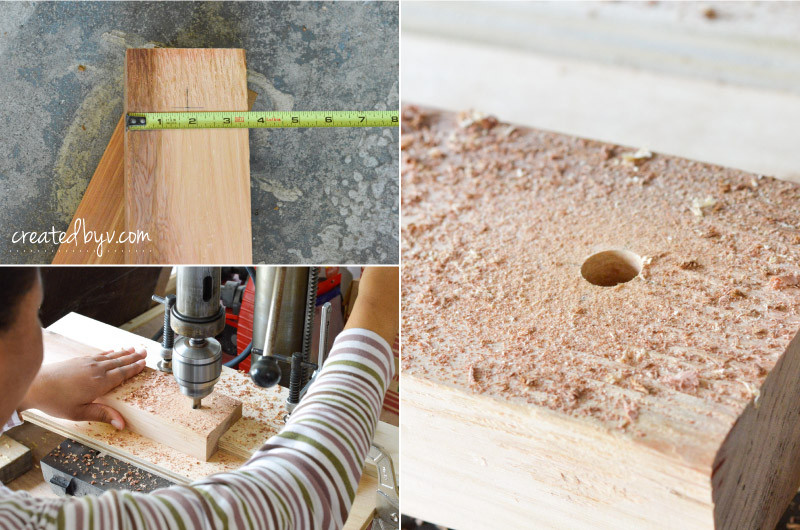
You want the square head of the carriage bolt to pull down into the wood to hold it in place, but you also want to avoid splitting the wood when tightening the bolt. Adding a countersink solves this issue, ensuring the bolt doesn’t strip in the hole and keep spinning or ruin the wood on the way in. A lock nut on the other end makes the connection snug when opening and closing the frame.


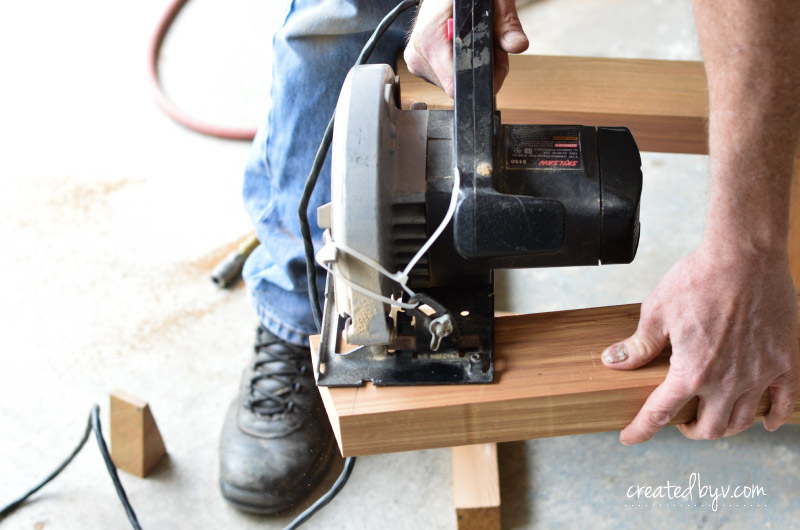
To help the shelf sit flush on the ground, cut the bottoms at a 20-degree angle on a miter saw. Unfortunately, I assembled the legs backwards so Sam had to re-cut the bottoms with a circular saw — learn from my mistake and pay close attention to this little detail!
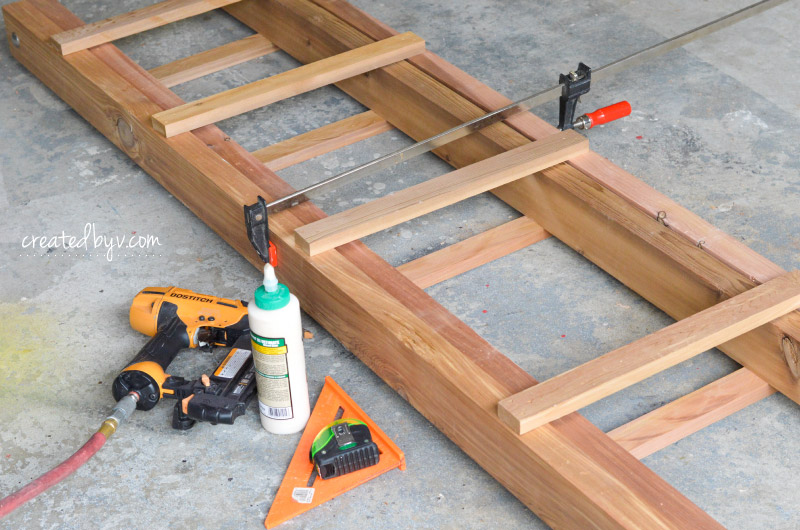
Step 3: Add the rungs.
The rungs serve as supports for the shelves. I used the leftover 2x4s, ripped in half, to make eight rungs. I cut them to length with a miter saw.
Mark where you want each shelf to sit on the frame, then glue and nail them in place. One set of rungs will be nailed to the outer legs of the frame while the other will be adhered to the inner legs. Let the glue dry overnight.
(The clamp in the picture below is there to take some of the bow out of the 2x4s.)
And here’s the “ladder” portion of the project!
Step 4: Cut and place shelves.
I used inexpensive cedar fence pickets — dog ears removed — for the shelves and cut them to length with a miter saw. I used two boards per shelf so they are 11″ wide.
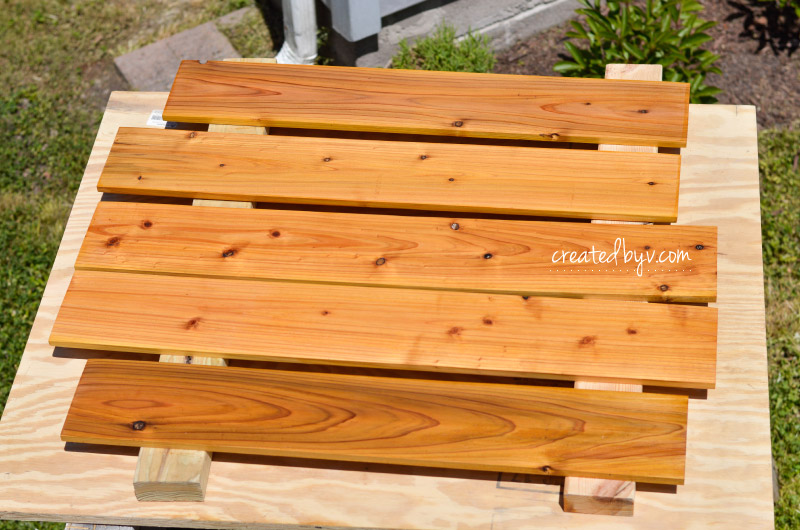
You can join them and/or attach them to the frame to help overall stability and avoid bowing, but I decided against both for the following reasons.
1. The 2x4s are beefy for my shelf size so it’s already solid. (In retrospect, I probably could have ripped them in half to save money.)
2. The ladder stays put in its open position thanks to the hardware and the ground.
3. There are no screws or nails to remove in order to put it away at the end of the season.
4. If the shelves warp badly, they can be easily replaced.
The only downside to not attaching the shelves is that the weight must be evenly balanced on each shelf. For instance, I picked up one plant to water and sent the one on the other end flying. I’m much more mindful of their placement now.
Step 5: Finish with waterproof sealer.
Since cedar is naturally resistant to rot, I almost went without sealing it. After some research, however, I decided to go ahead and protect it with Cabot’s Australian Timber Oil in Natural to prolong its natural beauty.
I am very happy with the result.
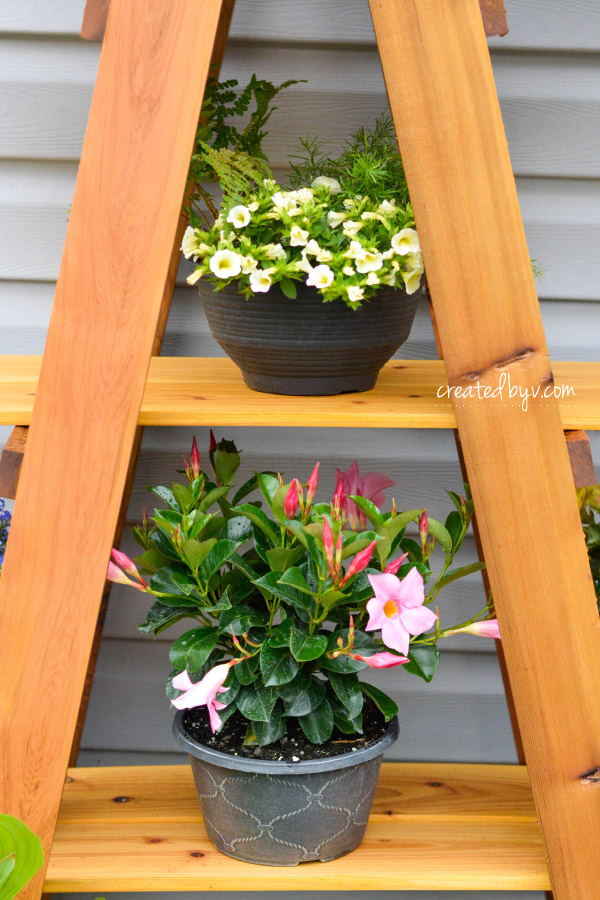
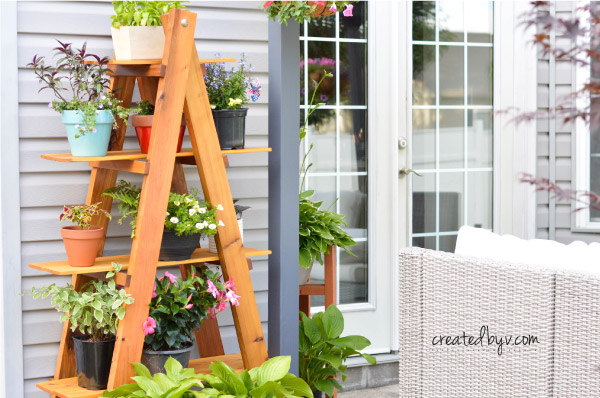
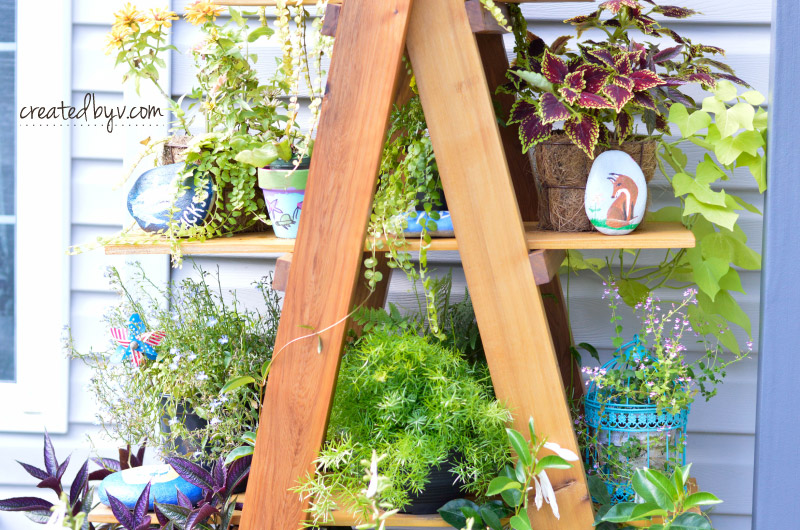
This summer, the stand has been home to a number of plants and flowers. It not only satisfies my green thumb, but also adds natural beauty to our outdoor space.
And it’s still in great condition for next year.
If you like DIY projects like these, I invite you to subscribe to the newsletter and join our creative community.
You’ll also receive inspiration for simple recipes, home decorating and much more! Thanks for reading! — v.
[mc4wp_form id=”1265″]
For more shelfie inspiration, check out this DIY: Removable Window Shelf for Plants
For more gardening inspiration, please follow my Pinterest board.


I’ve got to make this pronto! Actually TWO of them. I have so many plants in my plant room during the winter I have no room to walk through the room. I’ll put two boards between both “ladders”. I was going to cut 2 picket fences in half, set all sections UPRIGHT (secured with carriage bolts at the top) and put boards across some of the pickets between both “ladders”. Your plan looks so much easier… and lighter on my wallet too!
Great thanks, It’s really helpful,
And right now am in process of making my own here .
Because really being a gardener is all I have been yearning for.
How far apart do the bottom of the legs open up to? It shows 36in on your diagram but it also shows the length of the bottom shelf is 36in. Which visually doesn’t make sense. I ask because if I only open the ladder to 36in wide the legs don’t sit flat on the ground so now I wonder did I do something wrong?
“I used the leftover 2x4s…” – Where is this in the materials list: ” for the rungs…You only have four 2×4’s which are for the ladder frame
There are 8-ft 2x4s in the materials list, but the ladder frame is cut to size at about 6 feet or 72″ per the diagram. I used the left over 24″ per leg to make the rungs. I hope that helps with your building!
So simple and functional! Looks beautiful and I’m thinking a smaller version could work indoors as well!
Love this!
Thanks, Renata! It would work great indoors for plants, books, tchotchkes and the like!
This is beautiful! I love the shape and the natural wood color you ended up choosing. I could see having several of these both in and outside the house!
Thanks, Kathleen! Yes, I’m very happy with the stain protector. Now I’ll spend all summer “stylizing” this shelf! LOL